2012 - Volume #36, Issue #2, Page #19
[ Sample Stories From This Issue | List of All Stories In This Issue | Print this story
| Read this issue]
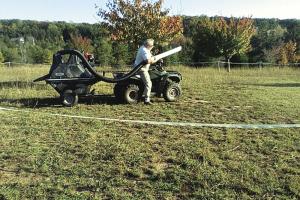
"Puckey Sucker" Cleans Up Pastures And More
 |
 |

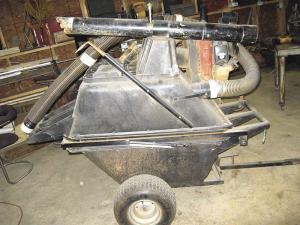
It costs less than $600 to put together and I havent found anything it wont pick up, says McNair.
Getting a power unit was the easy part. He picked up a $250, 50 cc Husqvarna leaf blower that had been returned for warranty work. The tougher part was deciding what to use for a vacuum vessel. He decided to use heavy-duty Rubbermaid utility cart tubs. The tubs were priced right at $170 each and had the volume and heavy-duty construction needed.
You cant use something too light, or it will implode under vacuum, explains McNair. I could have used steel wheelbarrows, but they were too small.
McNair mounted what would be the bottom half of his tank on an angle iron frame with its handles forward. Heavy-duty wheels and axle salvaged from an old Sears riding lawn mower were mounted underneath the frame with a hitch for towing and a latch that allows the tub to tip to the rear. Tube steel bolted to the tubs rim forms the bottom mating surface.
The second tub, with its handles pointed to the rear, became the top half. McNair bolted angle iron to its rim to create a flange to overlap the tube steel lip of the lower tub.
The steel rims provide a mating surface, but also serve to reinforce the tank when its under vacuum pressure, he says.
At the front of the tank, the top tubs angle iron extended forward several inches to hinge with the lower tub.
Weatherstripping on the overlapping flange and caulk on both rims helps ensure a near airtight seal.
The commercial vacuum carts I looked at were double walled to handle the pressure, says McNair. I didnt want to seal it too tight. I drilled a couple holes in the tank and covered them with a sliding tab so I can adjust the vacuum pressure.
To get vacuum pressure McNair cut a hole on top half of the tub and bolted the leaf blowers intake to it. A second and larger hole was also cut in the top tub.
The opening is about 16 in. by 24 in. and covered with double layer nylon screen framed with 2 by 2-in. wood. You need enough surface area to ensure that the velocity of the air flow slows so material drops into the tank.
McNair adds that he had to experiment to get the right sized opening. The first one plugged up the surface screen. With his current design, not even light hay is a problem.
Any entrained dust particles small enough to come through the screen continue through the blower fan and exhaust without a problem, he says. The screen is loose enough that when the vacuum pressure shuts off, it flexes and releases any material caught against it.
McNair cut 3 more holes in the top tub, one in the wheel housing and 2 in the debris capture area of the tank, one in front and one in the rear. A piece of stove pipe with a cap inserted in the housing hole lets McNair clean out any debris that finds its way past the screen.
He inserted a piece of plastic pipe into the hole on the front of the tank. The external stub serves to mount the vacuum hose. Sections of pvc pipe at the end of the hose are used to suck up manure and debris. McNair has fabricated a number of hose ends similar to those that come with shop vacs. They include a one-handed pipe wand for use from the ATV drivers seat and a two-handed sweeper for use on hard surfaces.
I cut serrations in the end of the wand to ensure air flow when its pressed to the ground, says McNair. You need air flow to keep material in the tube moving.
A piece of clear plastic mounted over the hole in the rear of the tub provides a viewing port to check the amount of material collected. A short rake in a holder on the side of the lower tub is handy for cleaning out material when dumping. Gas springs attached between the two tubs hold them open when the bottom tub latch is released and they are tipped to the rear.
One problem McNair ran into was overheating of the blower motor. To get more airflow, he built a small motor shroud out of sheet metal. Using a short piece of flexible hose and a right angle elbow inserted into the blowers discharge, he redirected air under the shroud.
Except for welding the frame and running gear, everything else can be done with a sawzall and a drill, says McNair.
Contact: FARM SHOW Followup, Sam McNair, 151 Croxton Road, Williamston, S.C. 29697.
Click here to download page story appeared in.

Click here to read entire issue
To read the rest of this story, download this issue below or click here to register with your account number.


