2009 - Volume #33, Issue #1, Page #27
[ Sample Stories From This Issue | List of All Stories In This Issue | Print this story
| Read this issue]
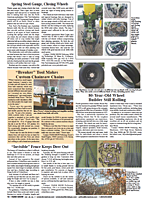
Farmall M Gets Heavy Duty 3-Pt.
 |

"I can pick up loads that will lift the front wheels off the ground," says McKenzie.
The retired postman fabricated each component of the 3-pt. except for the lift cylinders and the top link arm. To anchor the 3-pt to the tractor, he fastened steel plates, each made from four pieces of angle iron, to either side of the rear axle using U-bolts. These plates serve as the base to attach the lower arms.
McKenzie installed a steel plate under the differential, attaching it to the bottom inside corners of each axle plate. This plate serves as a base for the two hydraulic cylinders that raise and lower the upper arms.
The bolts that connect each side of the base plate to the axle plates also run through two steel uprights bolted to the differential housing and through the swivel ball ends of the lower arms.
The steel uprights are cut and drilled to match the axle housing where it bolts to the differential. Housing bolts go through the uprights and then through the axle housing to the differential housing.
A 4 by 6-in. angle iron extends across the two uprights and bolts to both. Bearings for a 2 1/4-in. shaft that had once served to lift a header on a one-row cotton picker were bolted to the angle iron. At the center point of the angle iron, two pieces of steel were welded in place to serve as an anchor clevis for the top link arm.
The shaft serves as a pivot point for the upper arms that raise and lower the lower arms. These upper arms had to be especially heavy duty to take the pressure of the two hydraulic cylinders that would provide the lift.
These upper arms also had to be fabricated to translate the hydraulic cylinder's 8-in. extension into a desired 32-in. lift height for the tips of the lower arms.
"I built the upper arms out of lengths of 1 by 3-in. steel plate," says McKenzie. "Each arm had two short plates with holes drilled in one end to fit over the pivot shaft. The other ends were cut at an angle to match angled ends of two longer plates that were boxed at the other end."
Welded together, the arms formed an angle of about 30 degrees. Once in position on the shaft, he welded them in place. A short piece of reinforcing steel plate was also welded into place just past the point at which each arm angled downward.
McKenzie welded a short length of plate with three holes in it to the inside of each arm just below the reinforcing plate. These serve as connection points for the lift cylinder clevis. A similar four-holed plate is welded to the outside plate of each arm at its boxed end, while a 3-holed plate is welded to the top of the lower lift arms.
McKenzie fabricated two adjustable lift arms to connect the upper lift arms and lower lift arms. One lift arm consisted of two clevis ends and a center rod. The other was a leveling arm using clevis ends and threaded rod.
"I can adjust how much I can lift or lower the tips of the lower arms and how much weight I can lift by adjusting which holes the various clevis are pinned to," explains McKenzie.
Contact: FARM SHOW Followup, Wayne McKenzie, P.O. Box 66, Parma, Mo. 63870. (ph 573 357-4435 after 5 p.m. or 573 281-6015 daytime).
Click here to download page story appeared in.
Click here to read entire issue
To read the rest of this story, download this issue below or click here to register with your account number.


