2011 - Volume #35, Issue #3, Page #17
[ Sample Stories From This Issue | List of All Stories In This Issue | Print this story
| Read this issue]
An Expert At Straw Bale Gardening
 |

That's the question gardeners often ask themselves after hearing Joel Karsten's presentation on straw bale gardening. He perfected his technique 8 years ago and now teaches it to others.
Karsten's garden "revolution" got started after his grandma mentioned a radio discussion she heard about growing potatoes under straw. That led to a discussion with his dad, Glen Karsten, about the possibility of growing things directly in straw bales. They decided to give it a try.
"We did 50 bales the first year," Karsten says about their gardening experiment. They tried various fertilizers and watering methods to give the composting process a good start. Taking a scientific approach, with the bales divided into 10 separate plots, he says the results were amazing. "Everything worked!"
Karsten has gone on to perfect his system. These are the basics:
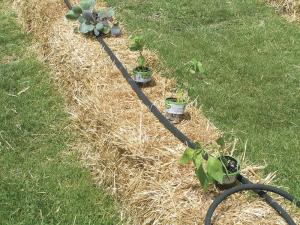
Place up to five straw (not hay) bales in a row, end to end, "cut" side up.
Drive in a 6 to 7-ft. post or stake in the ground at each end.
Provide growth support wires by fastening 14 to 16 gauge wire from post to post with twin bottom wires 10 to 12 in. above the bales and single wires at 10-in. intervals to the tops of the posts. (The twin bottom wires allow for insertion of plastic sheets to protect tender young plants.)
Condition the bales over a 10-day period: Days 1, 3 and 5, sprinkle 1/2 cup of cheap fertilizer (34-0-0) over each bale, then water thoroughly. Days 2, 4 and 6, water. Days 7 through 9 use 1/4 cup of the fertilizer plus water. Day 10, apply one cup of 10-10-10 fertilizer and water. Karsten advises using the cheapest fertilizer available.
Karsten says by the end of the conditioning period earth worms will have moved in and mushrooms will be sprouting in the bales. The strings that hold the straw together are important since they hold the outer shell of the bales while the inner part decomposes and becomes the perfect growing media. Tomatoes, pepper, cabbage, broccoli and other young plants can be planted in holes made in the newly composted middle of the bales. A 1 to 2-in. inch layer of potting soil placed on top of the bales is advisable for starting seeds that might slide into holes in the straw.
Straw bale gardening works for nearly all annual vegetables and flowers. One exception is corn which could only be planted one or two stalks per bale, limiting production. This planting method is also a solution for gardeners with tomato growing difficulties due to Fusarium and Verticillium wilt, fungi that stay in the soil and stunt or kill tomatoes planted in the same area year after year.
Benefits of straw bale gardening include: no weeding, no tilling, low cost, less stooping and bending, fewer bugs and pests, and ease of harvest. Karsten recommends installing a drip irrigation system for even watering. He says planting can be done up to a month earlier in the bales which give off heat as the straw composts. He offers many more tips and techniques on his website and in his handy booklet, "Guide to Straw Bale Gardening".
Karsten's current garden is at 240 bales. He estimates that his low labor garden will require only about 18 hrs. of work per season.
Contact: FARM SHOW Followup, Joel Karsten, 1313 Willow Circle, Roseville, Minn. 55113 (ph 651 470-2096; advprod@comcast.net; www.strawbalegardens.com).
Click here to download page story appeared in.

Click here to read entire issue
To read the rest of this story, download this issue below or click here to register with your account number.


