Custom Jig Keeps Bits Sharp
 ✖  |
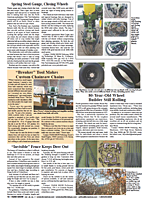
Roy Albertson keeps his drill bits sharp with an adjustable jig. A chuck threaded to a 1/2-in. bolt with a lock nut rides on the jig and holds the bit against the flat side of a grinding stone. Sliding components allow for minute adjustment, as well as simply flipping the bit over to sharpen the opposing side.
I designed it to be easier to use than others I have seen or used, says Albertson. The sharpening can be monitored and adjustments made on the jig without loosening or moving the bit.
The jig consists of a base with a sliding center panel with two 1 1/2-in. wide uprights to hold the chuck and bit parallel to the work surface. Once the panel is in the desired position, holes drilled through the base allow it to be screwed to the work surface. Albertson used 3/16-in. thick steel for all the parts.
The working end of the 3-in. wide base is cut at a 30-degree angle with a long edge of 13 1/2 in. Two 3/4-in. strips attached to the sides of the base plate form shoulders for the sliding panel. A hole drilled and threaded in the center of the base houses a lock knob to secure the sliding panel.
The 1 1/2-in. by 8-in. sliding panel has a long center slot that rides over the threaded hole. The upright at the leading edge of the panel serves as a rest for the chuck cradle. It has a threaded hold for a locking knob. The rear upright is slotted to cradle the 1/2-in. bolt.
The chuck cradle is designed to pivot on the upright. A curved slot on the vertical face of the cradle allows it to pivot when the threaded knob is loose. The cradle has a half circle cut out for the chuck to rest in with right angle 1 1/4 long by 1/2-in high chuck stops to either side. The chuck has a roll pin in it that rests against the chuck stops. To switch bit sides for sharpening, simply rotate the roll pin 180º.
Other sharpeners require removing the bit and repositioning it, says Albertson. This jig lets you monitor and adjust the bit on the jig.
To sharpen a bit, Albertson sets a 2 by 4 against the grinding wheel and marks the edge with a pencil line. The angled edge of the base plate is placed against the line and secured to the work surface. The bit is placed in the chuck with one of the cutting edges aligned with the punch mark on the face of the chuck. The bit is then tightened in place, and the chuck/bolt assembly is set on the jig rests. The lock nut against the chuck is loosened and the length of the bolt adjusted so the bolt head rides against the rest and the chuck sits in its cradle. With the cutting edge of the bit against the grinding wheel, the locking nut on the slide is tightened down. The design of the chuck will provide about a 1/4-in. play.
Once I start the grinder, I can slide the chuck-bolt assembly forward and into the wheel, pull it back and flip the pin over to sharpen the other cutting edge of the bit, says Albertson. To remove more metal, I loosen the lock nut and lengthen the bolt a quarter of a turn, snug down the nut and repeat.
My personal situation makes it difficult to respond to requests for information, says Albertson. I hope FARM SHOW readers will be able to use this information to fashion their own drill bit sharpener.
Contact: FARM SHOW Followup, Roy Albertson, 731 Hwy 3, Armstrong, Mo. 65230.
Click here to download page story appeared in.
Click here to read entire issue
Custom Jig Keeps Bits Sharp FARM SHOP Repairs Roy Albertson keeps his drill bits sharp with an adjustable jig A chuck threaded to a 1/2-in bolt with a lock nut rides on the jig and holds the bit against the flat side of a grinding stone Sliding components allow for minute adjustment as well as simply flipping the bit over to sharpen the opposing side I designed it to be easier to use than others I have seen or used says Albertson The sharpening can be monitored and adjustments made on the jig without loosening or moving the bit The jig consists of a base with a sliding center panel with two 1 1/2-in wide uprights to hold the chuck and bit parallel to the work surface Once the panel is in the desired position holes drilled through the base allow it to be screwed to the work surface Albertson used 3/16-in thick steel for all the parts The working end of the 3-in wide base is cut at a 30-degree angle with a long edge of 13 1/2 in Two 3/4-in strips attached to the sides of the base plate form shoulders for the sliding panel A hole drilled and threaded in the center of the base houses a lock knob to secure the sliding panel The 1 1/2-in by 8-in sliding panel has a long center slot that rides over the threaded hole The upright at the leading edge of the panel serves as a rest for the chuck cradle It has a threaded hold for a locking knob The rear upright is slotted to cradle the 1/2-in bolt The chuck cradle is designed to pivot on the upright A curved slot on the vertical face of the cradle allows it to pivot when the threaded knob is loose The cradle has a half circle cut out for the chuck to rest in with right angle 1 1/4 long by 1/2-in high chuck stops to either side The chuck has a roll pin in it that rests against the chuck stops To switch bit sides for sharpening simply rotate the roll pin 180º Other sharpeners require removing the bit and repositioning it says Albertson This jig lets you monitor and adjust the bit on the jig To sharpen a bit Albertson sets a 2 by 4 against the grinding wheel and marks the edge with a pencil line The angled edge of the base plate is placed against the line and secured to the work surface The bit is placed in the chuck with one of the cutting edges aligned with the punch mark on the face of the chuck The bit is then tightened in place and the chuck/bolt assembly is set on the jig rests The lock nut against the chuck is loosened and the length of the bolt adjusted so the bolt head rides against the rest and the chuck sits in its cradle With the cutting edge of the bit against the grinding wheel the locking nut on the slide is tightened down The design of the chuck will provide about a 1/4-in play Once I start the grinder I can slide the chuck-bolt assembly forward and into the wheel pull it back and flip the pin over to sharpen the other cutting edge of the bit says Albertson To remove more metal I loosen the lock nut and lengthen the bolt a quarter of a turn snug down the nut and repeat My personal situation makes it difficult to respond to requests for information says Albertson I hope FARM SHOW readers will be able to use this information to fashion their own drill bit sharpener Contact: FARM SHOW Followup Roy Albertson 731 Hwy 3 Armstrong Mo 65230
To read the rest of this story, download this issue below or click
here to register with your account number.


