2007 - Volume #31, Issue #5, Page #40
[ Sample Stories From This Issue | List of All Stories In This Issue | Print this story
| Read this issue]
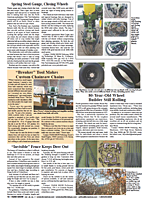
Garden Tractor Converted Into Loader Tractor
 |

The tractor is equipped with a 28-in. wide bucket on front and a 3-pt. mounted, 48-in. wide scraper blade on back. The blade angles and tilts and can be raised and lowered by turning a crank. He even built his own hydraulic cylinders for the loader bucket.
"It looks so good that I've had offers from people who want to buy it," says Maki. "I use it to grade my driveway, to haul rocks and with a home-built wagon to haul firewood, rocks, gravel, etc. I put chains on the rear wheels so it has enough traction to do heavy work in the woods. If I want I can mount the blade in place of the bucket. And, I can insert a pair of forks into slots in the bucket."
Something Maki is proud of is that all components on the tractor are built with the right proportion, making everything look right. "I've seen other home-built loader tractors where the loader looks too big. There's no need for big stuff on a small tractor. Even the hydraulic cylinders that raise and lower the bucket and tilt it, are built in proportion on my tractor."
The loader is set to lift no more than 400 lbs. so the tractor won't tip over.
He started with a Case 150 equipped with a 10 hp Kohler engine and a 2-speed transaxle with hydrostatic drive. The engine was worn out so he rebuilt it. The tractor's starter was shot so he replaced it with a used one off a Simplicity garden tractor. He removed the seat and rear fender pan, which was all in one piece, and built a steel frame to mount a new seat. He also added a pair of new rear wheel fenders designed for a trailer. The steering wheel was broken so he replaced it with one bought at a yard sale.
He wanted to keep exhaust fumes away from the driver's seat so he made a muffler and mounted it below the operator's platform, allowing exhaust fumes to exit at the back of the tractor.
One side of the tractor's rear axle was designed 3 in. shorter than the other so that an offset mower deck could cut closer to buildings. He made an adapter to lengthen the axle by 3 in. To help the front axle hold up to the loader he installed drag links from the front axle that run back to the frame.
The original tires were replaced with 28-in. high ATV wheels on back and 14-in. high wheels on front, adapting the tires to the tractor's original wheel rims.
He used 2 1/2 by 1 1/2-in. rectangular tubing to build the loader arms and 1/8-in. thick steel to build the bucket. The arms are detachable and are held by four bolts and two pins. The cutting blade on the bucket was made from strap iron with hard surfacing.
A belt-driven hydraulic pump on one side of the tractor is used to raise and lower the bucket and also to tilt it. He bored out the valve bodies from 1 3/4-in. sq. steel. "The valves are run in series which helps when scooping with the bucket slightly down. As the bucket fills and cycles up, the arms will pick up the load and a bit more forward progress is obtained into a hill or a pile of material, topping off the bucket," says Maki.
He made his own hydraulic loader cylinders by welding a cap onto each end of a length of schedule 40 seamless pipe. The rams were machined from 1-in. dia. stainless steel rod. He bought stock seals for the cylinders and machined gland nuts from aluminum.
"I used a lot of stuff that I already had to build it, which kept my total cost down to less than $600," says Maki. "I spent $150 on steel for the frame, $150 to have the hydraulic pump rebuilt, and about $50 for the starter. I paid $45 apiece for the tires which I bought used at an ATV dealer. I paid $50 for the seat and $20 for paint.
"The only real problems I had were with the ball bearings in the front wheels, which kept wearing out. I machined some sleeve bearings from nylon, which solved the problem.
"I added an air cylinder off a hatchback car on top of the bucket because I thought cold weather might keep the hydraulic oil stiff and the bucket wouldn't fall. However, I found that I don't need it."
The hydraulic pump is off a Cessna airplane and had a tang drive, meaning it drove off a camshaft and didn't have a pulley so he made an adapter with bearings in it.
A spring-loaded shock absorber on the top link of the 3-pt. hitch maintains down pressure on the blade at all times. "If the blade hits something hard it won't lift the rear wheels off the ground and i can maintain traction. Another shock absorber supports the seat," says Maki.
The blade's angle can be adjusted by pulling a pin. Either corner of the blade can be dropped down by adjusting a screw.
Contact: FARM SHOW Followup, Phil Maki, 4860 Morris Thomas Rd., Hermantown, Minn. 55811 (218 726-0457).
Click here to download page story appeared in.
Click here to read entire issue
To read the rest of this story, download this issue below or click here to register with your account number.


