Home-Built Outside Wood Boiler
 ✖  |
Mike Schultz of Grand Marsh, Wis., wanted the convenience of an outdoor non-pressurized wood boiler, but he didn't want to burn the half a face cord of wood a day that many commercial units consume. Instead, the maintenance mechanic at an injection molding company used his experience to build his own stove and boiler system.
Schultz focused on specific features: an efficient way to burn the wood, a way to increase the surface area that transfers heat, and efficient heat storage.
"To get efficient combustion, you want fire to burn and combust as fully as possible before extracting heat from it," Schultz says. "I never have to dampen down my combustion. Because of the high heat, the stove puts out very little smoke once it gets going. I virtually have no creosote," Schultz says.
There's an Aquastat draft regulator attached to the front of the stove as a required safety measure. It monitors water temperature, closing the draft if the stove gets too hot.
"You don't want it to boil," Schultz warns.
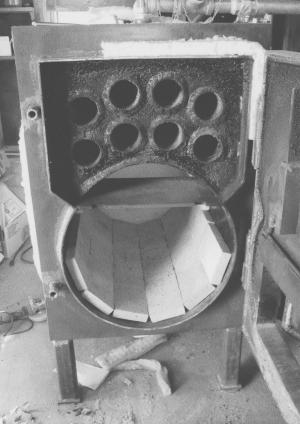
He built his stove from new and recycled materials. The firebox was made from a piece of a 20-in. dia., 1/4-in. thick steel pipe, and the outer jacket is a 24-in. dia. pipe, both purchased from a scrapyard. Schultz placed firebrick inside much of the firebox, which can hold half a dozen pieces of wood up to 22-in. long.
For other stove parts, he purchased square tubing and hot-rolled steel, which is made from recycled metal and less expensive than cold-rolled steel. To increase the heating surface, Schultz added smoke tubes made from 3-in. schedule 40 pipe above the firebox. Smoke goes through them from the front and into a smoke chamber in the back, which captures more heat.
Schultz shopped the internet for a good deal on two water lines of PEX (poly) tubing, which run underground from the stove to the heat storage tank in his house about 40 ft. away. He made his own insulated box for the tubing out of 2-in. high-density foam, by cutting blocking and strips out of the foam on his table saw. Cost for insulated tubing normally runs from $12 to $18/ft., Schultz says. His system cost just $2.50/ft.
In the basement of his farmhouse, 50 ft. of recycled copper pipe runs through a heat storage tank that holds 600 gallons of water. Thermostatic zone valves move the hot water over the plenum and turn on blower fans, sending heat into the home's ductwork.
"I can still get heat out of the system until the water is down to about 110 degrees," Schultz says. "The temperature is thermostat-controlled inside the house. It doesn't matter what the outside boiler is doing."
Another important part of the system is the expansion tank, which is positioned higher than the stove. The tank has room for the water level to expand when it heats. Schultz built his tank out of inexpensive cutoff scraps of steel.
Schultz notes that people considering making their own wood boilers should have good welding skills and an understanding of metal contraction and expansion.
"This is not your average do-it-yourself project," Schultz says.
He spent less than $600 on his stove, including the 30 to 40 lbs. of wire he used in his wire-feed welder. Overall, the system cost about $2,000.
With a drafty old farmhouse the first year, Schultz had to fill the stove about five times a day, but anticipates that will be reduced, since he has added insulation and installed new windows.
Schultz is willing to advise others interested in making their own outdoor boiler stoves.
Contact: Mike Schultz, 851 Fern Ave., Grand Marsh, Wis. 53936 (ph 608 584-4496; mschultz@maqs.net).
Click here to download page story appeared in.
Click here to read entire issue
Home-Built Outside Wood Boiler WOOD STOVES/FURNACES Wood Stoves/Furnaces (20L) 31-5-33 Mike Schultz of Grand Marsh, Wis., wanted the convenience of an outdoor non-pressurized wood boiler, but he didn't want to burn the half a face cord of wood a day that many commercial units consume. Instead, the maintenance mechanic at an injection molding company used his experience to build his own stove and boiler system.
Schultz focused on specific features: an efficient way to burn the wood, a way to increase the surface area that transfers heat, and efficient heat storage.
"To get efficient combustion, you want fire to burn and combust as fully as possible before extracting heat from it," Schultz says. "I never have to dampen down my combustion. Because of the high heat, the stove puts out very little smoke once it gets going. I virtually have no creosote," Schultz says.
There's an Aquastat draft regulator attached to the front of the stove as a required safety measure. It monitors water temperature, closing the draft if the stove gets too hot.
"You don't want it to boil," Schultz warns.
He built his stove from new and recycled materials. The firebox was made from a piece of a 20-in. dia., 1/4-in. thick steel pipe, and the outer jacket is a 24-in. dia. pipe, both purchased from a scrapyard. Schultz placed firebrick inside much of the firebox, which can hold half a dozen pieces of wood up to 22-in. long.
For other stove parts, he purchased square tubing and hot-rolled steel, which is made from recycled metal and less expensive than cold-rolled steel. To increase the heating surface, Schultz added smoke tubes made from 3-in. schedule 40 pipe above the firebox. Smoke goes through them from the front and into a smoke chamber in the back, which captures more heat.
Schultz shopped the internet for a good deal on two water lines of PEX (poly) tubing, which run underground from the stove to the heat storage tank in his house about 40 ft. away. He made his own insulated box for the tubing out of 2-in. high-density foam, by cutting blocking and strips out of the foam on his table saw. Cost for insulated tubing normally runs from $12 to $18/ft., Schultz says. His system cost just $2.50/ft.
In the basement of his farmhouse, 50 ft. of recycled copper pipe runs through a heat storage tank that holds 600 gallons of water. Thermostatic zone valves move the hot water over the plenum and turn on blower fans, sending heat into the home's ductwork.
"I can still get heat out of the system until the water is down to about 110 degrees," Schultz says. "The temperature is thermostat-controlled inside the house. It doesn't matter what the outside boiler is doing."
Another important part of the system is the expansion tank, which is positioned higher than the stove. The tank has room for the water level to expand when it heats. Schultz built his tank out of inexpensive cutoff scraps of steel.
Schultz notes that people considering making their own wood boilers should have good welding skills and an understanding of metal contraction and expansion.
"This is not your average do-it-yourself project," Schultz says.
He spent less than $600 on his stove, including the 30 to 40 lbs. of wire he used in his wire-feed welder. Overall, the system cost about $2,000.
With a drafty old farmhouse the first year, Schultz had to fill the stove about five times a day, but anticipates that will be reduced, since he has added insulation and installed new windows.
Schultz is willing to advise others interested in making their own outdoor boiler stoves.
Contact: Mike Schultz, 851 Fern Ave., Grand Marsh, Wis. 53936 (ph 608 584-4496; mschultz@maqs.net).
To read the rest of this story, download this issue below or click
here to register with your account number.


