Big Trencher For A Little Bobcat
Retired California engineer Jeff Craig needed a trencher for his skid steer, but he knew the auxiliary hydraulics on the Bobcat 543 were too small to power one. When he spotted an old trencher chain in the dumpster at a Bobcat dealer, he decided to build his own.
"The chain was rusty and beat up, but I salvaged about 3/4 of it," says Craig. "I spent about $100 on new teeth and repaired a couple of links."
He then spent several weeks designing a way to power the chain. He borrowed a 12 hp engine from a Troy-Bilt chipper. Its four-bolt engine mount made it easy to remove and install. He can put it back to the chipper, if needed.
When it came time for welding and assembly, Craig invited his dad William to fly out from Indiana. "We bought two big block bearings and all the hydraulics, but made the rest," says William, an experienced welder. "Jeff has all the lathes and equipment we needed."
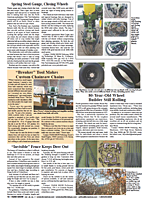
The 4-ft. by 16-in. frame was made with 3/16-in. thick, 2-in. by 4-in. steel tubing over-welded and ground down flat. Quick-tach arms and pins were mounted to one side, and a piece of 6-in. channel iron was welded across the upper corner of the other side to mount the Troy-Bilt engine.
"We mounted the trencher to one side of the frame so I can get close to buildings and fences with it," says Jeff.
The biggest challenge was to gear the high-speed motor down for the relatively slow speed trencher. Using a software program, Jeff came up with a ratio of pulleys and sprockets that reduced the speed by 10:1 twice over.
"A 2 1/2-in. double pulley on the motor drives a 12-in. pulley on a jack shaft," he explains. "On the end of the jack shaft is a 2 1/2-in. sprocket that drives a 12-in. sprocket on the trencher. The trencher runs at about 1/100 of the motor speed."
A double bearing on a spring over-center clutch mounted on the motor controls the belt drive. A 6-ft. arm extension on the bearing allows Jeff to engage the belt drive from his seat on the skid steer.
The trencher arm is hinged to the bottom of the frame. A hydraulic cylinder powered by the Bobcat auxiliary hydraulic outlet is mounted to the top of the frame. The cylinder connects to a bar that is attached and perpendicular to the trencher arm.
"If I am cutting a trench in a straight line, I just lower the Bobcat arm assembly to the ground and let it dig in," explains Jeff. "If I extend the cylinder, it forces the trencher perpendicular to the ground and I can cut sharp curves."
Regardless of straight line or sharp curves, one thing that Jeff doesn't do is change the pitch of the frame. "I always try to keep the motor level to keep the oil circulating," he says.
William says the trencher is easy to control from the seat of the Bobcat. "Just sit there and back up when it gets as deep as you want it," he says.
The trencher has a depth capacity of about 40 in. and a width of about 5 in., adjustable up to about 8 in.
"I spent a total of about $250 on parts for the trencher, not counting the round trip ticket to get my dad out here from Indiana," says Jeff.
So far the home-built trencher has fared well. Jeff used it to put in a sprinkler system around his home. The green belt it creates, along with other fire prevention tactics, protect his home from notorious California brush fires and lower his insurance premiums.
Contact: FARM SHOW Followup, Jeff Craig, 17747 View Terrace, Jackson, Calif. 95642 (ph 209 296-2234; j3craig@yahoo. com).
Click here to download page story appeared in.
Click here to read entire issue
Big Trencher For A Little Bobcat MISCELLANEOUS EQUIPMENT Miscellaneous 29-5-25 Retired California engineer Jeff Craig needed a trencher for his skid steer, but he knew the auxiliary hydraulics on the Bobcat 543 were too small to power one. When he spotted an old trencher chain in the dumpster at a Bobcat dealer, he decided to build his own.
"The chain was rusty and beat up, but I salvaged about 3/4 of it," says Craig. "I spent about $100 on new teeth and repaired a couple of links."
He then spent several weeks designing a way to power the chain. He borrowed a 12 hp engine from a Troy-Bilt chipper. Its four-bolt engine mount made it easy to remove and install. He can put it back to the chipper, if needed.
When it came time for welding and assembly, Craig invited his dad William to fly out from Indiana. "We bought two big block bearings and all the hydraulics, but made the rest," says William, an experienced welder. "Jeff has all the lathes and equipment we needed."
The 4-ft. by 16-in. frame was made with 3/16-in. thick, 2-in. by 4-in. steel tubing over-welded and ground down flat. Quick-tach arms and pins were mounted to one side, and a piece of 6-in. channel iron was welded across the upper corner of the other side to mount the Troy-Bilt engine.
"We mounted the trencher to one side of the frame so I can get close to buildings and fences with it," says Jeff.
The biggest challenge was to gear the high-speed motor down for the relatively slow speed trencher. Using a software program, Jeff came up with a ratio of pulleys and sprockets that reduced the speed by 10:1 twice over.
"A 2 1/2-in. double pulley on the motor drives a 12-in. pulley on a jack shaft," he explains. "On the end of the jack shaft is a 2 1/2-in. sprocket that drives a 12-in. sprocket on the trencher. The trencher runs at about 1/100 of the motor speed."
A double bearing on a spring over-center clutch mounted on the motor controls the belt drive. A 6-ft. arm extension on the bearing allows Jeff to engage the belt drive from his seat on the skid steer.
The trencher arm is hinged to the bottom of the frame. A hydraulic cylinder powered by the Bobcat auxiliary hydraulic outlet is mounted to the top of the frame. The cylinder connects to a bar that is attached and perpendicular to the trencher arm.
"If I am cutting a trench in a straight line, I just lower the Bobcat arm assembly to the ground and let it dig in," explains Jeff. "If I extend the cylinder, it forces the trencher perpendicular to the ground and I can cut sharp curves."
Regardless of straight line or sharp curves, one thing that Jeff doesn't do is change the pitch of the frame. "I always try to keep the motor level to keep the oil circulating," he says.
William says the trencher is easy to control from the seat of the Bobcat. "Just sit there and back up when it gets as deep as you want it," he says.
The trencher has a depth capacity of about 40 in. and a width of about 5 in., adjustable up to about 8 in.
"I spent a total of about $250 on parts for the trencher, not counting the round trip ticket to get my dad out here from Indiana," says Jeff.
So far the home-built trencher has fared well. Jeff used it to put in a sprinkler system around his home. The green belt it creates, along with other fire prevention tactics, protect his home from notorious California brush fires and lower his insurance premiums.
Contact: FARM SHOW Followup, Jeff Craig, 17747 View Terrace, Jackson, Calif. 95642 (ph 209 296-2234; j3craig@yahoo. com).
To read the rest of this story, download this issue below or click
here to register with your account number.


