"Tiller Trailer" Takes The Work Out Of Rototilling
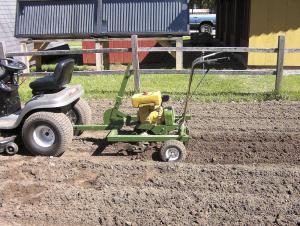
"I'm 72 years old and find that it's much easier to ride a garden tractor than it is to wrestle with a front tine rototiller," says Virlyn Burie, Wallace, Mich., who built a "tiller trailer" for his 30-year-old Deere rototiller. It allows him to pull the rototiller behind his Sears garden tractor, instead of having to operate it manually.
The 2-wheeled trailer is made from 2 by 2 steel tubing and pins to the sides of the rototiller. A sprocket-type lever welded on front of the trailer attaches to a hinged bracket he mounted on front of the tiller. He uses the trailer-mounted lever to control the depth of the tiller. The trailer is painted Deere green to match the tiller.
"I use it on my 30 by 60-ft. garden. It works great," says Burie. "The rototiller has a forward motion of its own so the garden tractor is just guiding it, not pulling it. It takes only about 30 seconds to remove the rototiller from the trailer if I ever need to operate it manually.
"To operate the rototiller, I roll it into the trailer frame and pin it on. After rope starting the tiller and revving up the throttle, I adjust the lever to the depth I want. Then I jump on the tractor and go. Usually I operate the rototiller at its maximum depth.
"I spent $5 apiece for the wheels, which I bought new. The rest of the trailer was built from scrap material. Commercial rototillers designed to be pulled behind a garden tractor are available, but they can sell for as much as $1,000.
"The key in building it is to locate the pivot points so the rototiller always operates at the proper depth. Before building the brackets, I put both the trailer and rototiller on a level floor and put wood blocks under the trailer until I had the rototiller at the depth I wanted it. Then I marked the spots for the pins."
He used 1/4-in. steel plate to make the cog-type lever. The lever handle pivots from the center of the sprocket. To make the teeth, he placed the chain sprocket on the metal and then traced around it. Then he drilled around an old no. 60 chain sprocket.
Homemade brackets attach permanently to the rototiller. A 3/4-in. pipe welded to a piece of 2 by 4 rectangular tubing mounts across the rear with a 1/2-in. bolt. On front of the tiller is a yoke that mounts across the front and sides of the tiller frame that pins to the depth lever.
"At first I tried mounting a length of angle iron across the front of the rototiller and hooked it onto the lever. However, whenever the rototiller would hit a stone it would lurch upward and bend the tiller frame. Plating the sides of the tiller frame to the angle iron with 4 by 3/16-in. plate solved the problem," notes Burie.
Contact: FARM SHOW Followup, Virlyn Burie, N5199 R1 Lane, Wallace, Mich. 49893 (ph 906 788-4279; email: joanburie@ alphacomm.net).
Click here to download page story appeared in.
Click here to read entire issue
"Tiller Trailer" Takes The Work Out Of Rototilling TILLAGE EUIPMENT Miscellaneous 29-4-17 "I'm 72 years old and find that it's much easier to ride a garden tractor than it is to wrestle with a front tine rototiller," says Virlyn Burie, Wallace, Mich., who built a "tiller trailer" for his 30-year-old Deere rototiller. It allows him to pull the rototiller behind his Sears garden tractor, instead of having to operate it manually.
The 2-wheeled trailer is made from 2 by 2 steel tubing and pins to the sides of the rototiller. A sprocket-type lever welded on front of the trailer attaches to a hinged bracket he mounted on front of the tiller. He uses the trailer-mounted lever to control the depth of the tiller. The trailer is painted Deere green to match the tiller.
"I use it on my 30 by 60-ft. garden. It works great," says Burie. "The rototiller has a forward motion of its own so the garden tractor is just guiding it, not pulling it. It takes only about 30 seconds to remove the rototiller from the trailer if I ever need to operate it manually.
"To operate the rototiller, I roll it into the trailer frame and pin it on. After rope starting the tiller and revving up the throttle, I adjust the lever to the depth I want. Then I jump on the tractor and go. Usually I operate the rototiller at its maximum depth.
"I spent $5 apiece for the wheels, which I bought new. The rest of the trailer was built from scrap material. Commercial rototillers designed to be pulled behind a garden tractor are available, but they can sell for as much as $1,000.
"The key in building it is to locate the pivot points so the rototiller always operates at the proper depth. Before building the brackets, I put both the trailer and rototiller on a level floor and put wood blocks under the trailer until I had the rototiller at the depth I wanted it. Then I marked the spots for the pins."
He used 1/4-in. steel plate to make the cog-type lever. The lever handle pivots from the center of the sprocket. To make the teeth, he placed the chain sprocket on the metal and then traced around it. Then he drilled around an old no. 60 chain sprocket.
Homemade brackets attach permanently to the rototiller. A 3/4-in. pipe welded to a piece of 2 by 4 rectangular tubing mounts across the rear with a 1/2-in. bolt. On front of the tiller is a yoke that mounts across the front and sides of the tiller frame that pins to the depth lever.
"At first I tried mounting a length of angle iron across the front of the rototiller and hooked it onto the lever. However, whenever the rototiller would hit a stone it would lurch upward and bend the tiller frame. Plating the sides of the tiller frame to the angle iron with 4 by 3/16-in. plate solved the problem," notes Burie.
Contact: FARM SHOW Followup, Virlyn Burie, N5199 R1 Lane, Wallace, Mich. 49893 (ph 906 788-4279; email: joanburie@ alphacomm.net).
To read the rest of this story, download this issue below or click
here to register with your account number.