You have reached your limit of 3 free stories. A story preview is shown instead.
To view more stories
(If your subscription is current,
click here to Login or Register.)
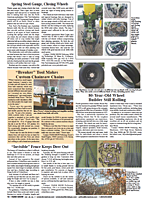
Amazing Overhead Shop Door Features Removable Center Post
When Fred Butuk put up a state-of-the-art farm shop, one of his priorities was to fit it with a top-of-the-line overhead door.
"There were plenty of overhead doors out there that would have fit the building, but I wanted to heat it and I didn't want the doors to let out all the heat," says Butuk, of Insinger, S
..........
You must sign in, subscribe or renew to see the page.

You must sign in, subscribe or renew to see the flip-book
Amazing Overhead Shop Door Features Removable Center Post FARM SHOP Handy Hints 24-3-44 When Fred Butuk put up a state-of-the-art farm shop, one of his priorities was to fit it with a top-of-the-line overhead door.
"There were plenty of overhead doors out there that would have fit the building, but I wanted to heat it and I didn't want the doors to let out all the heat," says Butuk, of Insinger, Saskatchewan.
His shop building is a 40 by 60-ft. steel frame structure. When he put up the building, Butuk left a door opening 26 ft. wide by 14 ft. high. Besides wanting to heat the building to a comfortable temperature, he needed specially sized doors. He wanted two separate doors in that opening, but he also wanted to be able to bring in equipment bigger than either door, such as his combine with its 24 ft. head.
He talked to several door manufacturers, but none made a door like he wanted. No one made a door thicker than 2 in., and that wasn't enough insulation for Butuk.
And no one could figure out how to make two overhead doors that would open independently and still allow him to use the full width of both openings when he wanted to. "Everybody said I would need a permanent center post," he says.
Rather than settle for something less than he wanted, Butuk decided it couldn't be that difficult to build his own door. It took a lot of study and some help from a friend, Grant Simpson, who educated him on the workings of overhead doors.
The finished door has two sections: one 10 ft. wide and the other 16 ft. wide. Between them is a removable post that can be taken out once both doors are raised. When I'm in the pickup, I open the 10-ft. door. If I have something a little bigger, I use the 16-ft. door," he says. "I don't lose nearly as much heat as I would if I had to open the entire 26-ft. width."
The doors are made up of 2-ft. high sections, 4 in. thick. He put a double layer of 2-in. thick foil-backed Styrofoam sheets inside. Outside, he used 20-ga. satin-coated, galvanized steel which he could paint to match his building.
He had the metal cut exactly to size and delivered to a metal fabricating shop where the door sections were formed to size. They were bent into a æU' shaped channel profile which fit over the two thicknesses of sandwiched Styrofoam. Stabilizing metal spars were used in the door panels to give the door additional stiffness.
"To assemble the door sections, we just pop-riveted all the pieces together, making sure that the parts were held true in a jig."
Hinges, rollers and drums posed little problem. He just bought the heaviest door hardware available.
The biggest challenge Butuk faced was how to raise the big doors. His 16-ft. door weighs nearly 1,350 lbs., and the 10-ft. door is about 840 lbs.
"All the door makers said they could not guarantee winding a spring for such a door, so I figured a counter-balance system would be the best way to do it," he says.
He made flat, square concrete counterweights out of concrete that he attached to lift cables. There's one weight per each section of the door. "I made the weights just a few pounds lighter than the doors," he says, "so I could add slugs to fine-tune operation of the door."
Lift cables run from the bottom of the door to the top and then completely across the width of the building to the opposite corner where the counter weight frame is located. The seven counter weights (per door) are suspended on the cable so that as each door panel reaches the top of the track, a weight comes to rest on the floor until the door is all the way up and all the weights are piled on top of each other.
The removable doorpost is made from 4 by 8-in. rectangular tubing. Butuk turned the doorpost into an air pressure tank by welding it completely shut. It's heavy enough to withstand maximum air pressures he can produce in the shop. Air brake "pots" are individually plumbed into each end of the post to hold it in place.
The bottom brake pot is pressurized to force a 2-in. pin into an anchor point in the floor. To remove the post, he simp
To read the rest of this story, download this issue below or click
here to register with your account number.


