"I've built three of these low-cost buildings so far, starting with a 12 by 25-ft. one last January. So far they show no signs of leaks or deterioration of the plastic," says John Borst, Westlock, Alta., who uses heavy duty plastic silage bags to put up low-cost home-built "hoop-type" buildings.
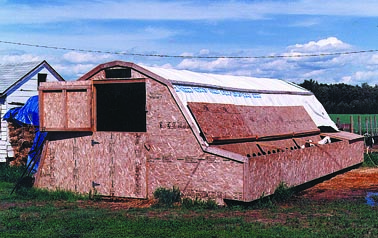
His latest building is 14 ft. wide, 30 ft. long, and 9 ft. high. The plastic covers an arched framework made from oil field sucker rod and drill stem. The ends of the structure are framed in with sheets of plywood and one side has an enclosed feed bunk.
Borst uses the building to house about 30 purebred goats but says the building would work for other kinds of livestock or to store machinery, etc.
"I'm really happy with it. No problems after one year," says Borst.
To make the arched frame he used 25-ft. lengths of 7/8-in. dia. sucker rod and bent them into a "U" shape. The rods are secured to a rectangular frame welded together from 2 5/8-in. dia. drill stem pipe. Borst used a cutting torch to cut a series of holes 2 ft. apart into the top of of the drill stem that the sucker rods fit into. Bending the rods was a 2-person job. One person placed one end of the rod in the hole and held the rod steady while someone else tied a rope to the other end and pulled the rod until it would slip into the frame on the other side. The rods didn't all bend evenly, so to make the arch more uniform and more rigid he used 3/4-in. metal conduit clamps to fasten a pair of 16-ft. long 2 by 8 wooden boards to the rods along each side of the arch and about 4 ft. off the ground. He also clamped three rows of 2 by 4 boards along the top of the structure, spacing each row of boards 4 ft. apart. The bottom 4 ft. along each side is covered with plywood.
He stretched a used plastic silage bag over the hoops and then nailed more 2 by 4's over the plastic and to the boards below. To frame in the ends of the structure he first welded a series of 1 3/4-in. long, 5/16-in. dia. bolts to the top of the drill stems. Then he drilled holes in the boards, laid them flat, and bolted them on to form a base for the plywood sheets.
He made a 4-ft. wide, 7-ft. high plywood door on one end of the building. He built an 8-ft. sq. creep feeder inside the building to provide extra grain to baby animals. To make the feed bunk he cut a series of 8-in. dia. holes in the plywood every 2 ft. A 3-in. wide, 18-in. long slot extends down from each hole to keep the animal from pulling its head back and wasting feed. The animals eat from in-side the building, while Borst fills the bunks from outside. Hinged plywood lids keep out rain and snow. The building stands inside a 50 by 100-ft. pen.
"A commercial hoop-type structure of comparable size would've cost much more," says Borst. "I paid for 16 sucker rods and 6 lengths of drill stem. My biggest cost was for the plywood.
"My buildings are small because I keep my goats in small pens. However, these buildings can be made to any length or width by simply screwing the rods together and connecting the drill stems. I don't need a high building for goats, but it could be made higher by bolting the arch on top of 4 or 8 ft. high walls. I work for a dairy farmer who recently put up a similar building on a 4-ft. high wall and uses it to store sawdust bedding. If I wanted I could store two pickups end to end in my building or two cars side by side. To clean out manure I can remove some of the framing on one end of the building so that I can drive a tractor in.
"The
hardest part was stretching out the plastic, which is fairly heavy. I got the
plastic from the dairy farmer I work for. Each week I rolled up the tube until
I had enough to cut off what I needed. The 9 mil plastic is guaranteed for
three years. It had been used to store silage for two months before I got it.
One problem was that pressure from the silage caused the plastic to stretch in
places so that when I put it on the arch there were lumps all over it. New
plastic would probably work better, although for my first building I used
plastic off a bunker silo and it was nice and smooth. I used an 18-ft. wide,
48-ft. long hay tarp on my most recent building and it works great.
"To provide insulation I spliced two new lightweight tarps and placed them under the silage plastic, but I don't think they were necessary.
"The plastic I used wasn't as wide as the building so I had to splice two sections of it together. The tarp on my new building is all one piece which makes it much easier to install. If the plastic develops a hole I can use tape to repair it. If I ever have to replace the plastic I can simply pull the 2 by 4's and plastic off and put new plastic on."