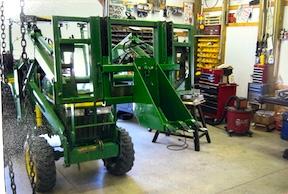
Unable to clean up a creek bank without a backhoe, Dale Freeman transformed his front-end loader into a fronthoe. The fronthoe boom mounts to what Freeman calls a “unibracket,” which quick attaches to the front-end loader arms. He used the system with multiple attachments for many years before selling it to a neighbor.
Fabricating the system was relatively easy for Freeman, who recently retired after 40 years of building nuclear components for the U.S. Navy. He applied the same focus on precision to his home workshop, outfitting it with a full range of machining and welding tools.
“I learned early on that if you want to make it right, it’s hard to do with a hacksaw, so I started buying tools,” says Freeman. “I try to make everything to plus or minus 0.001.”
Freeman knew he needed a secure way to mount his planned attachments to the loader arms, one that could handle the torque from the boom and dipper arm. He chose a two-part system with a unibracket and an adapter plate.
The unibracket is a 25 by 50-in. rectangular frame made from 2-in. square tubing. Freeman mounted four vertical lengths of 2 1/2 by 2 1/2-in., 1/4-in. angle iron to the front of the frame using dowel pins to align sets. He mounted the angle iron in facing pairs with 2-in. spacing with 0.015 clearance.
“I bought HLA weld-on quick-attach brackets for about $180 and spaced them to fit the existing loader footprint,” recalls Freeman.
He used a simple technique to align them on the unibracket with the loader arms.
“I welded one to the unibracket frame and then lined up the loader arms and clamped the second bracket where it needed to be,” says Freeman. “Once it was clamped in place, it was easy to weld it solid to the frame.”
Freeman used 2 by 4-in., 1/4-in. thick rectangular tubing for the front hoe boom and dipper arm. A steel plate welded to the end of the boom bolts to holes in a matching adapter plate that mounts to the unibracket.
He fabricated his adapter plate using 2 by 2-in. tubing for the rectangular frame. Its verticals align with the spacing between the pairs of angle iron on the unibracket. A 3/8-in. steel plate is centered on and welded to the frame’s horizontals. The boom end plate attaches to it with bolts.
Holes in the verticals align with holes in the angle iron. They enable the adapter plate to be pinned higher or lower on the unibracket as needed.
The lack of a third SVC on his tractor eliminated a hydraulic cylinder between the boom and dipper arm. Since the front-end loader can tilt the boom forward and backward, he chose a bolt circle and manual adjustment. He welded steel plates with multiple holes to the sides of the boom's end. Precisely calibrated holes at the end of the dipper arm allowed him to adjust the bolt circle, with one pin enabling rotation and another locking it in the desired position.
With the unibracket and front hoe in place, Freeman went on to build a 9-in. wide bucket and a second tool he calls his “creek rake.” It features a back frame with a 1/2-in. steel plate that bolts onto the end of the dipper arm. Three 2-in. wide vertical arms on the back plate support three horizontal arms with a grate made of five 1-in. dia. steel rods. Slightly angled end plates on the horizontal arms let the rake slide across the surface rather than dig into it.
“Using the rake, I could grab small boulders and other large rocks and pull them out of the stream by backing up and rolling the loader,” says Freeman. “Dirt and smaller rocks fell through the grate.”
He also designed a stump bucket that attaches directly to the unibracket. The bucket, with three teeth, is made from 1/4-in. steel plate mounted on a frame of 2 by 2-in. steel tubing. Like the fronthoe adapter plate, the frame’s verticals are sized to fit the vertical angle iron on the unibracket.
Freeman found the front loader useful for other tasks too, with the addition of a 3-pt. quick pick-up bolted to a 25 by 50-in. rectangular frame.
He could mount a landscaping rake and pull it backward to rake, or drive forward to drag. He could also reverse a rear-mount snow blade by 180 degrees and attach it as a front blade.
“The pick-up was only $80 at Harbor Freight,” says Freeman. “It was really handy for reaching up a bank with the rake or to taper and clean ditches out.”
The frame is made of horizontal 2 by 4-in. steel tubing welded to vertical 2 by 2-in. sq. tubing. Steel plates on the rear of the frame act as bases for another set of HLA quick-attach brackets.
A short piece of 2 1/2-in. steel tubing is welded to the bottom of the two verticals on the frame. This let him set the 3-pt. frame down on a carrier with casters for moving around the shop.
Welding a receiver hitch tube to the center of the frame made backing his 24-ft. gooseneck into his barn easy.
“A lean-to on the side of the barn made it difficult to back the trailer in with my truck, but I could push it in with the tractor,” says Freeman. “It’s like threading a needle getting it into place.”
Contact: FARM SHOW Followup, Dale Freeman, Monroe, Va. 24574.
