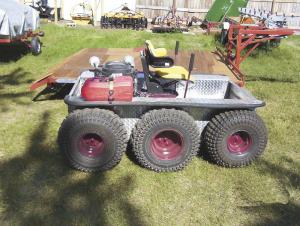
"Made It Myself" 6-Wheeler
Jim Tesmer calls his homebuilt 6-wheeler a toy. But the amphibious, wall climbing, zero-turn machine has done heavy work in the woods and swamps as well as providing dizzying fun for the 63-year-old Minnesotan. And it only cost about $3,000 to build, even with all new materials and parts.
Years ago, I had a 6-wheeler that I bought cheap. It was a fun rig until one axle broke and another one bent, he recalls. Having a zero-turn Ariens mower got me to thinking that the drive unit could make an interesting vehicle.
When he saw a zero-turn drive unit for sale in a Surplus Center catalog (www.surpluscenter.com), he came up with a plan.
Four matching frames of 14-gauge 1-in. square tubing support the bearings for the axles (the kind used in go-karts). Tesmer determined the frame length by slightly over inflating three tires and leaving an inch between them.
I raised the front axles 1-in. higher than the back two axles so the front axle only helps when climbing over uneven surfaces, Tesmer says.
He added 1/8-in. plate to the frame to fasten greasable bearings so he can drive through water and snow. He built frames for the drive unit and used 1/8-in., 1 by 2-in. rectangular tubing in the front and back for extra strength.
The hardest part was getting all 6 axles true with each other and with the bearings and plates. An angle iron and vise grips helped a lot, Tesmer says.
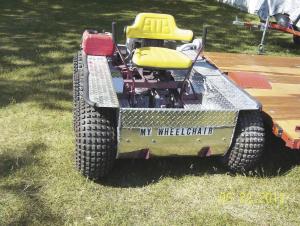
To install the zero-turn drive he mounted a 50-chain sprocket on the hubs with Grade 8 bolts.
By using a double tooth sprocket and single chain I was able to run one chain to the rear axle and one to the middle axle. The front axle is driven by a chain from the middle axle. When the drive unit was in place I mounted the engine to line up the drive belt and added a tensioner, Tesmer explains.
The engine is a 23 hp Kohler electric start with a home-built exhaust system.
He installed the seat and steering levers and used his plasma cutter to cut the body out of two 4 by 8-ft. sheets of 1/8-in. aluminum bright tread plate, after making cardboard patterns.
I was able to bend the fenders and front stiffening lip at work with a sheet metal brake. After that, I cut and drilled holes to mount the bearings outside the body to make it easier for possible replacement. I put silicone under the bearings to seal out water, he says.
The only problem Tesmer had was with the drive belts. He replaced them with No. 40 chain after cutting the hubs off the transmission pulleys and welding sprockets in place.
The 6-wheeler had no leaks after driving through a foot of water and it was a blast in 4 in. of snow. Tesmer drove it about a foot up his garage wall and has made himself dizzy driving it.
Turning is wild due to the fact that the seat is centered and the zero-turn drive unit is able to have one sides wheels going forward while the other side is going backward with me sitting at the pivot point like a top, he says.
Tesmer found everything he needed at farm or tool stores and online. Hes willing to offer tips to FARM SHOW readers interested in making their own 6-wheelers.
Tesmer has worked as a mechanic and spends his free time improving and building practical implements and tools to use around his home.
Contact: FARM SHOW Followup, Jim Tesmer, 2612 22nd St. S.E., Rochester, Minn. 55904 (jtes49@hotmail.com).
Click here to download page story appeared in.
Click here to read entire issue
Made It Myself 6-Wheeler ATV S Jim Tesmer calls his homebuilt 6-wheeler a toy But the amphibious wall climbing zero-turn machine has done heavy work in the woods and swamps as well as providing dizzying fun for the 63-year-old Minnesotan And it only cost about $3 000 to build even with all new materials and parts Years ago I had a 6-wheeler that I bought cheap It was a fun rig until one axle broke and another one bent he recalls Having a zero-turn Ariens mower got me to thinking that the drive unit could make an interesting vehicle When he saw a zero-turn drive unit for sale in a Surplus Center catalog www surpluscenter com he came up with a plan Four matching frames of 14-gauge 1-in square tubing support the bearings for the axles the kind used in go-karts Tesmer determined the frame length by slightly over inflating three tires and leaving an inch between them I raised the front axles 1-in higher than the back two axles so the front axle only helps when climbing over uneven surfaces Tesmer says He added 1/8-in plate to the frame to fasten greasable bearings so he can drive through water and snow He built frames for the drive unit and used 1/8-in 1 by 2-in rectangular tubing in the front and back for extra strength The hardest part was getting all 6 axles true with each other and with the bearings and plates An angle iron and vise grips helped a lot Tesmer says To install the zero-turn drive he mounted a 50-chain sprocket on the hubs with Grade 8 bolts By using a double tooth sprocket and single chain I was able to run one chain to the rear axle and one to the middle axle The front axle is driven by a chain from the middle axle When the drive unit was in place I mounted the engine to line up the drive belt and added a tensioner Tesmer explains The engine is a 23 hp Kohler electric start with a home-built exhaust system He installed the seat and steering levers and used his plasma cutter to cut the body out of two 4 by 8-ft sheets of 1/8-in aluminum bright tread plate after making cardboard patterns I was able to bend the fenders and front stiffening lip at work with a sheet metal brake After that I cut and drilled holes to mount the bearings outside the body to make it easier for possible replacement I put silicone under the bearings to seal out water he says The only problem Tesmer had was with the drive belts He replaced them with No 40 chain after cutting the hubs off the transmission pulleys and welding sprockets in place The 6-wheeler had no leaks after driving through a foot of water and it was a blast in 4 in of snow Tesmer drove it about a foot up his garage wall and has made himself dizzy driving it Turning is wild due to the fact that the seat is centered and the zero-turn drive unit is able to have one sides wheels going forward while the other side is going backward with me sitting at the pivot point like a top he says Tesmer found everything he needed at farm or tool stores and online Hes willing to offer tips to FARM SHOW readers interested in making their own 6-wheelers Tesmer has worked as a mechanic and spends his free time improving and building practical implements and tools to use around his home Contact: FARM SHOW Followup Jim Tesmer 2612 22nd St S E Rochester Minn 55904 jtes49@hotmail com